

"Established in 2019 - but with 30 years of experience."
My father was a General Contractor, and from a very young age I went to work with him and learned from him on weekends and during the summers. In the 1990's I started my own company and ran it until 1999 when I moved to Arizona. Along the way I have been constantly learning and constantly practicing. I often joke "if I wasn't doing this for a living, I'd be doing it for a hobby." I attended the Arizona Contractor School and received my AZ Plumbing Dual-License for Residential & Commercial Plumbing. Marco's Tankless LLC was established in 2019 but draws on over 30 years of accumulated experience. We are Licensed, Bonded, & Insured ROC-325688
Some projects from long ago that I'm especially proud of...

These folks have a huge yard, but not much space at the top before the property begins to go downhill. A lot of trees, brush, lack of sunlight, and erosion made growing grass difficult.

We basically increased the usable space of their backyard by 30%, but we added a huge amount of space down below. Also getting rid of all that brush, now there is sunshine, we can grow grass, have a barbecue, etc. These folks can finally enjoy their backyard.

these people had a large property but most of it was unusable. Small area up top with a steep slope, overgrown woods promoted ticks, lyme disease, etc.

My greatest project- 100 foot long retaining wall with integrated stairs & drainage, 14 feet high at the highest point. 1.5 feet of 3/4" crushed stone behind the wall so the dirt & water never touch it. Pressure treated lumber is set each row 0.5" back from the previous for a gentle slant backwards which helps with strength. Anchors every 8 feet go into the earth. 15 years later it still looks as good as new. As of 2019 it is now 25 years old I need to go and get new pics.

further back view from the previous photo; you can get a sense for just how much usable space they now have at the bottom. All of this area was once brush & small trees, basically unusable. Now they have practically a half a soccer field to run and play, ride minibikes, camping, etc. We basically quadrupled their yard.

We interlocked the stairs into the big wall using the same 8x8 railroad ties, crushed stone underneath, it is as solid as rock. After we made the stairs we made the railing. Stairs are 4 feet wide, plenty of room to bring anything you need up and down.

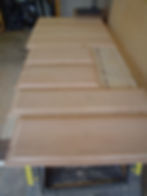
cutting the various pieces of 3/4" oak for use as rail & style or board inserts. Many manufacturers use 1/4" thick lumber for the board inserts, I used the same 3/4" as everywhere else.

high quality tools can sometimes double as functional art. These Rockler bits are more expensive than most but work extremely well. The steel is harder, and they are more balanced than the cheaper versions.

a close-up shot of the type of joinery I make for cabinets. This joint is so strong, it almost doesn't require glue. The joint allows for a panel to be inserted in the middle as well.
using the largest router bit we shape the edges of the panels to make a flaired or "raised" panel that fits into the groove created by the rail & style joinery. The result is a tight strong fit that will last a lifetime. The weight and durability of these doors is apparent.

we added a "golden oak" stain and then 3 coats of polyeurethane with wet-sanding 400-grit sandpaper between each coat. The result is beautiful but also functional. These cabinets are very strong and do not require a middle style, as a result you can open both doors and have almost 3 feet of space with which to put items. No particle board here, just 3/4" cabinet grade plywood for the boxes, and 3/4" oak for the doors. No hardware required I routed in a fingergrip on the underside.

after a fun day in the garage, this is the result...

this is the "caboose kitchen" so typical in the old 1970-era Hallcraft homes. We tore it down and made an island there instead.

removed that old caboose-kitchen, installed a nice Island with custom cabinetry, new sink / faucet / dishwasher. I fit the cabinets before removing them for final stain & gloss. Willow inspecting my work. He lived 14 years, he's watching my work from above now.

another view of the island & custom cabinetry. The large doors on the right open up to reveal large drawers that slide out on smooth heavy duty ball-bearing slides.

was a lot of work but I would say we did a great job of updating that old caboose kitchen into a spacious modern Great Room.

a view from the other side shows removal of the old ugly glass sliding door and installation of beautiful double French Doors with side-light on either side.

an old creosote retaining wall that was falling over had to be removed & rebuilt. The people also wanted to be able to use more of their backyard.

I incorporated a planter into the design of the wall, as well as a corner near the corner, so it doesn't just appear to be a big straight boring wall.

Here you can see just how close the old wall was to their patio

and here you can see just how much new space we were able to give them. About 8 extra feet of width, going across almost the entire backyard.

a view from a different angle, also shows the massive increase in usable backyard space.

heavy guage steel used to build the bar strong enough to stand on

added granite & stone facing; under-lighting really made it pop

To build custom booths, no blueprints were readily available, so I made my own. I built a 1/12 scale model out of construction board, 1inch = 1 foot. When a sheet of cabinet-grade plywood costs $45 (at that time), it's worth spending a day to get all the measurements and angles perfect. The backrests especially were tricky as they not only interlock but also tilt back. Each booth also has a secret storage compartment.

these fit together but are also designed to easily pull apart. Secret storage compartment visible though not finished- each will get a floor 3/4" plywood lifted 1" off the floor to avoid water damage.

Dad helping with assembly

My Dad's biggest contribution was the Upholstery. I had no experience with Upholstery before, but he knew how to do it. We bought Marine-quality leather-style covering, and after 12 years of commercial use it still looks as good as new.

Red Mahogany stain & 3 coats of clear semi-gloss polyurethane with wet-sanding between each coat. After 12 years of commercial use still looks new.

all 4 booths ready to accept customers. Throughout our 12 years in business, these booths remained a favorite of most customers. They were almost always the first to be requested for reservations.